You must have heard that good finishes are essential for woodworking basics. It is important to use the right tools. The finishing of wooden objects will give them a beautiful shine, and protect them. There are many different 'finish' options available. Learn more about the different types and colors of 'finish' so you can choose the right one to suit your project. Below are some tips and tricks to help you get started with woodworking.
Drills
Woodworking basics drills have many uses. These handy tools are not only used to drive screws but can also be used to make wood plugs, countersinks and saw holes. The adjustable clutch allows for the stopping of drilling when the torque required is achieved. These tools can be used for drum-sanding, grinding and stirring paint. You should consider these tools if your goal is to get started in woodworking. These tools will save you time, money, and help you get started.
Clamps
There are many different types of clamps available for woodworking. But what exactly are clamps and how do you use them? To ensure that your clamps are working effectively, here are some things to remember. To maximize the life of the clamps you use, you must keep them in good condition. You should clean and dry them regularly. Depending on the material of your clamps, you should oil them periodically. For safety reasons, clamps should be kept in a well-ventilated area, such as your garage or shed.
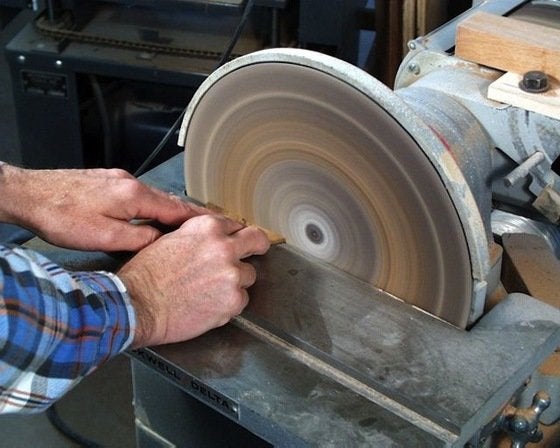
Smoothing planes
A smoothing plane is the final step in woodworking. It is used to smooth out minor rough spots and give the surface a glass-smooth appearance. The smoothing plane is typically 8-10 inches in length and made of European beech hardwood with an extremely durable hornbeam sole. Several types of smoothing planes are available, from simple to complex, and are great for beginners. You can find helpful tips below to help you choose the right plane for you.
Glue
There are many different types of wood glue. Most likely, you know a few. Over the years, you've developed techniques that allow you to work with less than desirable qualities. Sometimes your preferred glue may not be able to bond your project. This is when you should look into catalogs and home centers for help in choosing a new brand. Here are some tips for choosing the right wood glue to suit your project.
Woodturning
You should be familiar with the following information if your goal is to learn woodturning basics. Wear safety gear. You should always wear leather steel-toe boots when working in a woodshop. A second thing you should know is how to inspect the lumber. A defective piece of wood can make it dangerous to turn. You must also choose the best wood turning tools.

Scroll down
The use of scroll saws in woodworking can be traced back to the early days of civilization. Scroll saws began as large machines that could reach up to 10 feet in height. The scroll saws could be operated by foot or pedal. Later scroll saws were made smaller and more portable but all worked in the same way. Eventually, the scroll saw evolved into the modern scroll saw. Scroll saws are an excellent choice for woodworkers who wish to create art pieces.
FAQ
How much should a Woodworker Charge per Hour?
The hourly rate for a professional woodworker varies depending on many factors, including skill level, experience, availability, location, and other variables.
An hourly wage for skilled woodworkers is between $20 and $50.
A woodworker with less experience may be able to charge $10 an hour.
How much will it cost to get started?
Each project is unique so there aren’t exact numbers. Here are some factors to help you estimate how much money you will need.
-
Cost of materials
-
Tools and equipment
-
Time spent on the Project
-
Your hourly rate
-
What amount of profit can you expect to make?
-
It doesn't matter if your goal is to hire help
It's a good idea for beginners to start with small projects like frames and boxes. As you gain more experience, you will be able tackle more complicated projects.
How long does it take for furniture to be finished?
It depends on the type of wood you choose, the complexity of the design, and the amount of finishing you apply. For example, hardwoods require more maintenance than softwoods. Hardwoods tend to be more expensive that softwoods. They are more durable and can withstand moisture better. Finishing furniture can take anywhere from one week up to three months.
How often do I need to buy new supplies
You will likely need to replace some tools over time. If you are using hand tools, you will need to sharpen them frequently. Power tools will require replacement parts every so often. To avoid buying too much at once, try to spread your purchases out over a few months.
How do I know what type of wood I'm dealing with?
Always check the label before purchasing wood. The label should provide information about the wood species, moisture content, and whether preservatives have been used.
Statistics
- Average lumber prices rose about 600 percent between April 2020 and May 2021. (familyhandyman.com)
- The U.S. Bureau of Labor Statistics (BLS) estimates that the number of jobs for woodworkers will decline by 4% between 2019 and 2029. (indeed.com)
- Most woodworkers agree that lumber moisture needs to be under 10% for building furniture. (woodandshop.com)
- Woodworkers on the lower end of that spectrum, the bottom 10% to be exact, make roughly $24,000 a year, while the top 10% makes $108,000. (zippia.com)
External Links
How To
Tips on how to drive a nail in wood
It is essential to pick the right size and style of hammer before you can drive a nail in wood. The most commonly used types of Hammers are claw hammers. Each kind of hammer has its own advantages and disadvantages. A claw hammer works well when you're trying to hit nails with a heavy hammer. However it is difficult to precisely control where the blow hits. A sledgehammer is useful for striking large areas at once but too heavy to be effective for smaller tasks.
After you've chosen the right tool, hold your hand flat to the handle so it rests comfortably in one of your palms. Grab the handle tightly, but do not squeeze too hard. Your wrist should be relaxed while you hold the hammer straight upwards. Swing the hammer back towards the ground, with your aim at the middle of the nail. You should feel the impact of your hammer hitting the nail. Try swinging a hammer using a block wood to practice until you are comfortable.
Once you are ready to drive the nail, place the hammer close to your body. The nail should be perpendicular to wood's surface. Keep your focus on the tip of each nail. Then, swing the hammer forward. Next, follow the motion of your hammerhead. Repeat this action several times, gradually increasing the speed of the swing. Once you have mastered this technique, increase the power of your swings. You can hold the hammer over your shoulder and forcefully bring it down. This way, you'll be able to put more energy behind your blows.
Once you have made the first hole, remove your hammer. To pull out the remaining nails, use a screwdriver or pry bar. You should ensure that the nails are flush with the board's surface to avoid splitting the wood.